

Jtalk is an implementation of the Smalltalk language that runs on top of the JavaScript runtime. It is designed to make client-side development faster and easier.
Jtalk is written in itself, including the parser and compiler. Jtalk compiles into efficient JavaScript, mapping one-to-one with the equivalent JavaScript. There is no interpretation at runtime.
Try a right now!
Client-side usage
Load the full Jtalk Smalltalk environment with the IDE in your page:
<script src="js/jtalk.js" type="text/javascript"></script>
<link rel="stylesheet" type="text/css" href="css/jtalk.css"/>
Or the deployment JavaScript file only (without the Smalltalk parser or compiler):
<script src="js/jtalk.deploy.js" type="text/javascript"></script>
Read the documentation to learn more about writing applications in Jtalk.
Download


Documentation
1. Introduction 
This documentation is a work in progress.
Jtalk is a young piece of code and evolves quickly. Some features are still incomplete and you may very well encounter bugs.
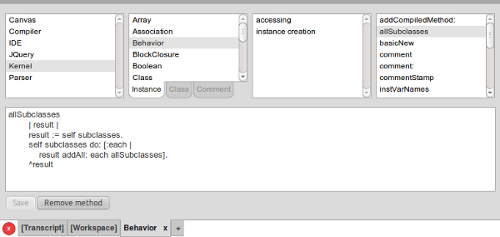
Jtalk is an implementation of the Smalltalk-80 language. It allows developers to write client-side heavy web applications in Smalltalk. Jtalk includes an integrated development environment with a class browser, workspace and transcript.
Jtalk includes the following features:
- It is semantically and syntaxically equivalent to Pharo Smalltalk (the implementation considered as the reference)
- It is written in itself and compiles into efficient JavaScript
- A canvas API similar to Seaside to generate HTML
- A jQuery binding
2. Differences with other Smalltalk implementations 
3. Committing changes to disk with the web-based IDE 
The class browser is able to commit changes to disk. The commit category button will send a PUT request with the compiled JavaScript code of all classes in the selected class category in a file named js/CATEGORY.js.
The easiest way to enable committing is probably to setup a webdav with Apache.
The following steps explain how to setup a webdav for Jtalk with Debian, but the setup on OSX and other Linux distros should be similar.
Installing Apache and enabling the dav module
Evaluate the following as root:
~# apt-get install apache2
~# a2enmod dav
~# a2enmod dav_fs
Creating a password for the webdav
htpasswd -c /etc/apache2/htpasswd-webdav USERNAME
Setting up the webdav directory
Add the following lines to the default vhost (in /etc/apache2/sites-available/default):
Alias /jtalk/ "/path/to/jtalk/"
<Directory "/path/to/jtalk/">
    Options Indexes MultiViews FollowSymLinks
    DirectoryIndex index.html
    AllowOverride None
        Order allow,deny
    allow from all

    Dav on

    AuthType Basic
    AuthName "jtalk"
    AuthUserFile /etc/apache2/htpasswd-webdav
    <LimitExcept GET OPTIONS>
            Require valid-user
    </LimitExcept>

</Directory>
Make sure the group www-data has required rights to modify files in the webdav directory.
Restarting Apache
To restart Apache, evaluate the following:
~# /etc/init.d/apache2 restartand go to
http://localhost/jtalk/.
The class browser should now be able to commit changes to disk.
4. The counter example 
The following example is the traditional Seaside-like multi-counter application. The buttons at the bottom of each counter increase or decrease the counter.
Open a on the Counter class in the Canvas class category.
Each Jtalk widget is a subclass of Widget. A widget is a graphical component. The #renderOn: method is used to generate HTML using the HTML canvas.